When it comes to photography, there are a variety of shots a photographer can take that help you tell a story for your viewer. Many of the terms I’ll be using this month originate in film-making, which I learned in various courses in art school like storyboarding and film history, and are equally relevant to toy photography.
A CAMERA SHOT size refers to what elements are included in your photo within the outside edge (called the FRAME) of your photo. It can also refer to the purpose of the photo.
Some of the most common framing camera shots are:
- Extreme Wide Shot
- Wide Shot
- Full Shot
- Medium Wide Shot
- Medium Shot
- Medium Close Up
- Close Up
- Extreme Close Up
Some camera shots that refer to the purpose used:
- Establishing Shot
- Detail Shot
- Over-the-shoulder shot
- POV Shot
- …And many more!

The use of multiple of these different shots for your photography will create variety and interest between photos. It’s also great for maximizing the photography you can create with one set/build. Personally, I find that by shooting both wider and up close, I save time by setting up a scene once and getting multiple shots out of it.
This month’s tips will touch on subjects from previous Tips. In 2020, foolishbricks did a brief overview of some of the different camera shots in his TIPS: Anatomy of an Image, and nocturnelle9 had tips on camera lenses and focal lengths in her TIPS: Wide angle vs Telephoto. In 2022 minifigs_lifescescenes wrote a series on camera angles in TIPS: Using Camera Angles.
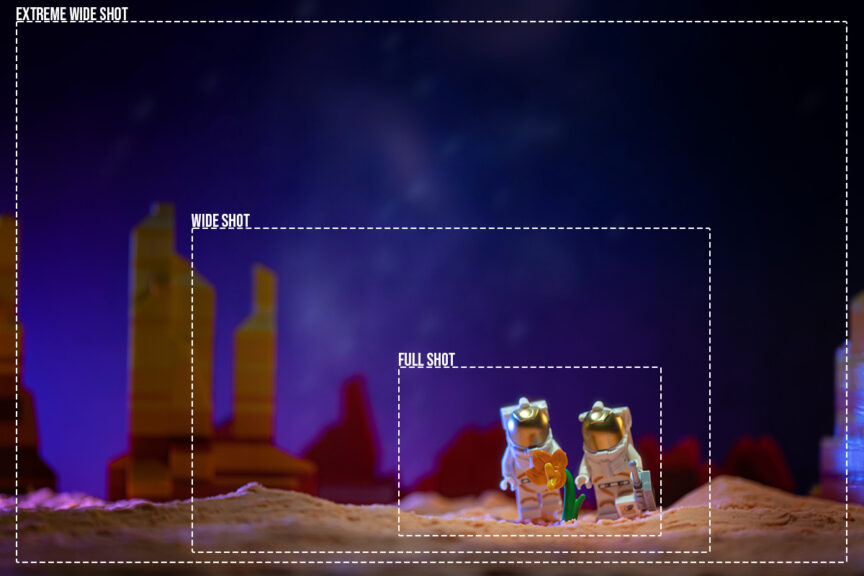
Wide Shot
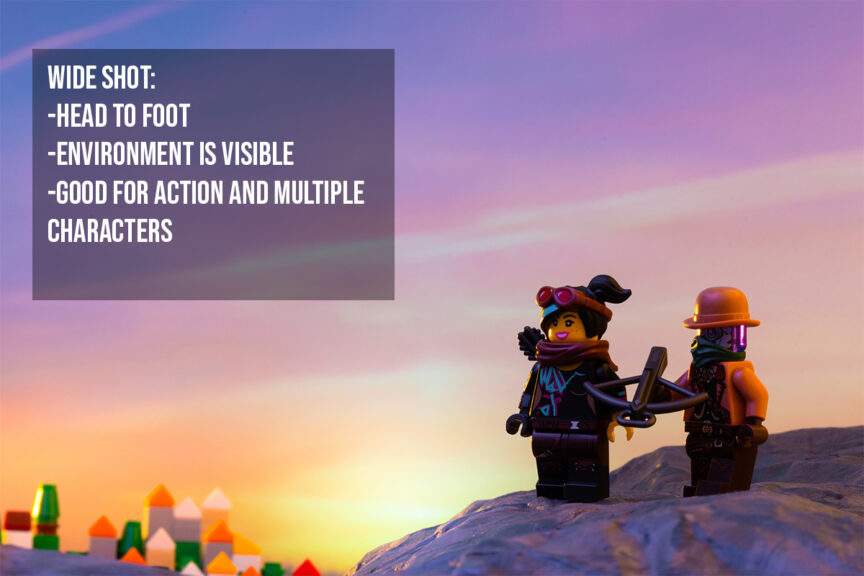
Also called the long shot, the wide shot frames the character from head to foot with details of the environment visible. The wide shot is great for showing the action as well as the location.
This shot is also great for MOC builders and to showcase your LEGO sets. In LEGO photography terms, it means the full set, your MOC, the outdoor location you’re shooting at, or your diorama.
Equipment-wise, this shot is very approachable for beginner LEGO photographers, because it can be shot on cell phones or your kit lens. If you want to shoot dramatic natural locations with your LEGO toys, a wide-angle lens would be a good choice (less than 35mm, the lower the number, the wider the angle of your lens).
Some variations of the wide shot are the Extreme Wide Shot and the Establishing Shot.
Extreme Wide Shot
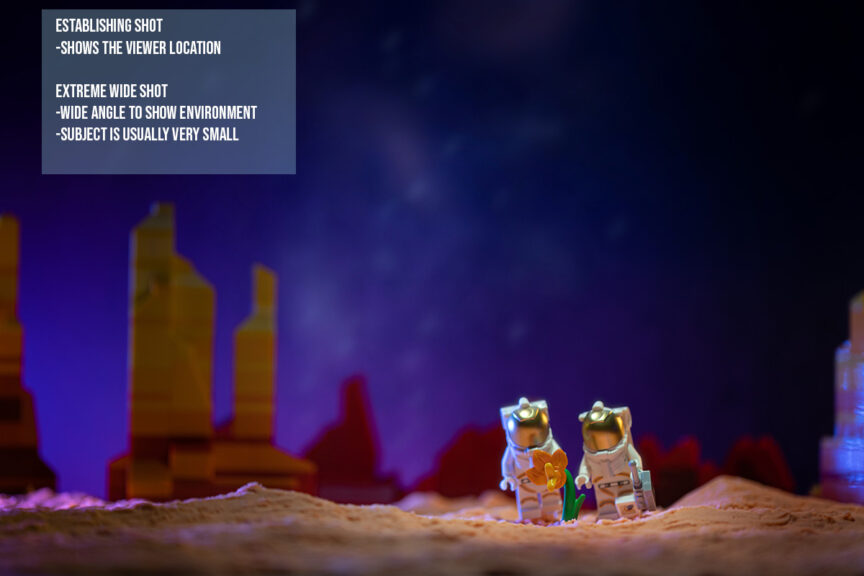
The extreme wide shot is mostly environment. If a character is in it, the character is generally very small. City skylines, wide open desert, and aerial views of a mountain are all examples of an extreme wide shot.
This shot is great for expressing loneliness or isolation since the viewer is so distant from the subject.
In the real world, extreme wide shots require using a wide-angle lens or being very distant from the scene we’re shooting, but for us LEGO photographers, we can get away with creating micro-builds and using a regular lens.
Establishing Shot
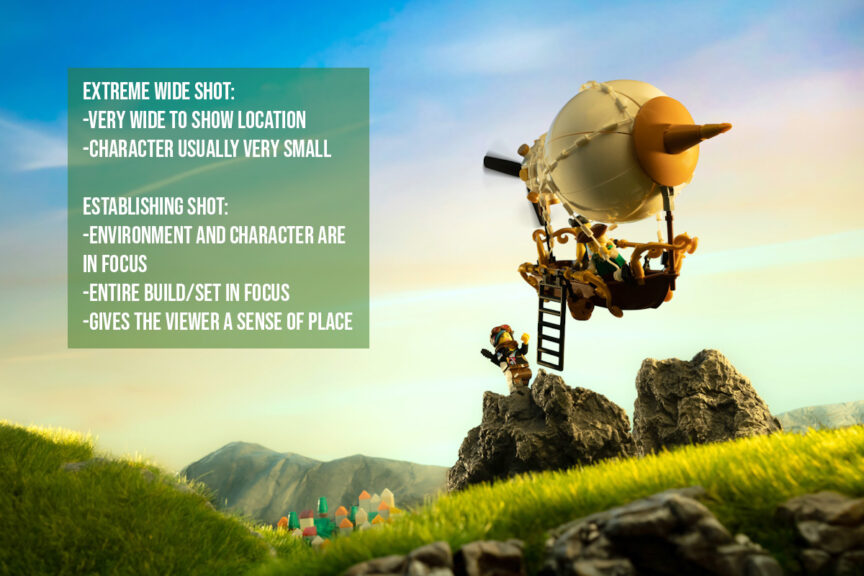
The establishing shot shows your viewer the location and environment. In story terms, it’s the WHERE in the story. Whether it’s a wide shot of a bedroom or alleyway or an extreme wide shot of a cityscape or desert, it tells your viewer where the action is taking place.
The establishing shot’s subject is equally place and character (if there is a character), so you’ll want all of your LEGO set or MOC to be in focus.
Full Shot

The Full Shot frames your character from head to foot. With some of the environment, the face, as well as all the limbs visible, the full shot is great for action and comedy scenes that have a sense of place. This is also a great shot for having interactions with multiple characters.
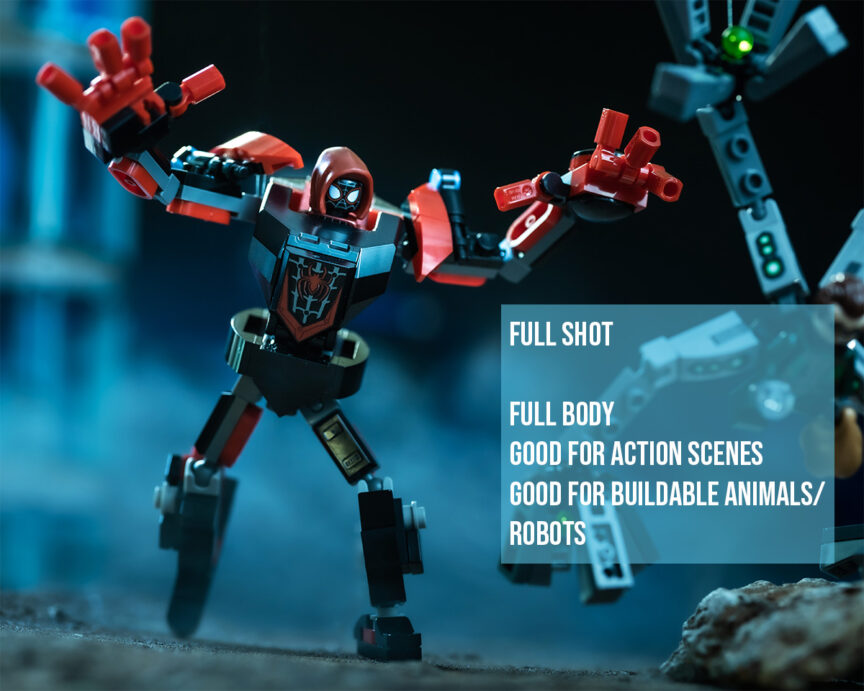
In terms of LEGO photography, this is your minifig shot, but it can also be great for showing off your buildable animals and robots. If your subject is a LEGO minifig, you’re going to need a lens capable of shooting macro. If you have a large dragon or a robot the size of the very large LEGO Hulkbuster, you wouldn’t even need a macro lens.
Medium Wide Shot
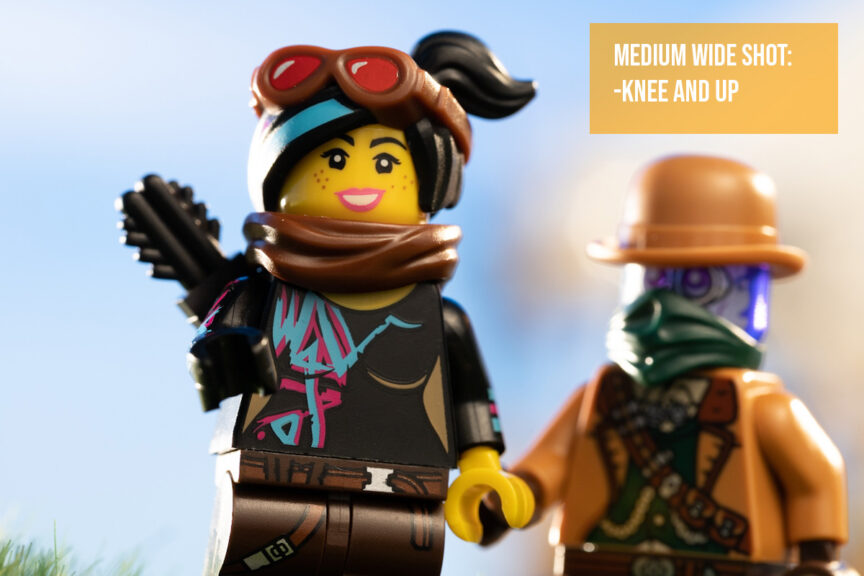
The Medium Wide Shot frames your character from knees and up. This shot is useful to get a sense of the character and some motion since you can still see part of their legs. It also helps place the character since you can still see some of the environment.
Now, LEGO minifigures don’t have knees, so the bottom of the frame would be somewhere mid-leg. There are variations on the medium-wide shot that go slightly above or below the knees, but the difference is a few millimeters up or down on a minifig.
Medium Shot
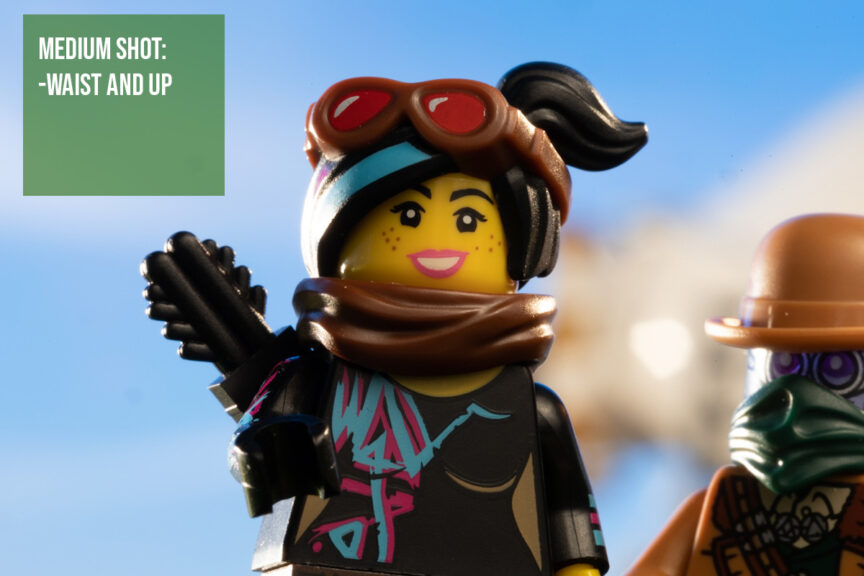
The Medium Shot frames your character from the waist and up. This shot is used to show what a character is thinking or feeling while still being able to see their environment. The framing allows you to see the character interact with their environment and is close enough to see their response.
Medium Close Up

The Medium Close Up Shot frames your subject from the chest and up. Think of this as your standard minifig portrait. This shot is mainly to highlight the personality and emotions of your subject. Since their hands can be visible, objects in the eye line or in their hands are an excellent way to tell a story.
Close Up
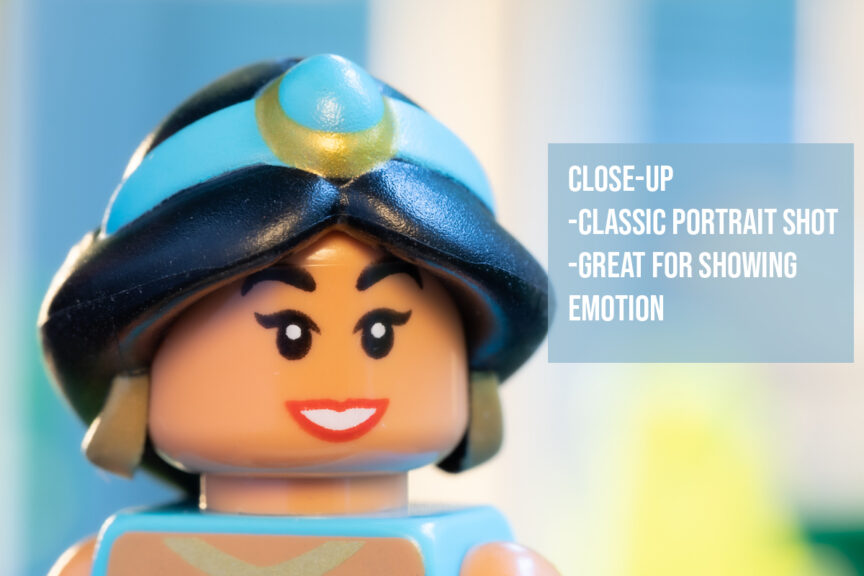
The Close Up Shot is all about the head. Generally, we humans look at a person’s eyes first, so make sure you get the eyes in focus. I suggest using manual focus with a small aperture (the higher the number the smaller the aperture, so f8 and up).
To take LEGO close-ups, you’re going to need a macro lens that has a very short minimum focusing distance. A super macro lens capable of macro photos of insects would be the one you’re looking for, not all macro lenses can get quite that close.
Extreme Close Up
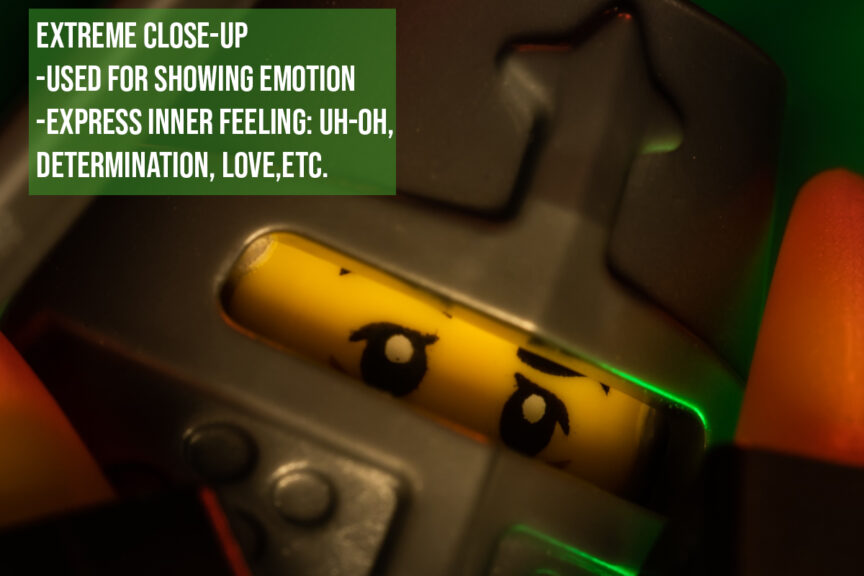
The Extreme Close Up frames the eyes or other details. In film, framing just the eyes gives the viewer a sense of the character’s inner emotions, it can also be an extreme close up of various accessories and builds. This shot was commonly used in the old spaghetti westerns, where you see the extreme close-up of the cowboy’s eyes and holster right before the duel at high noon.
Detail Shot
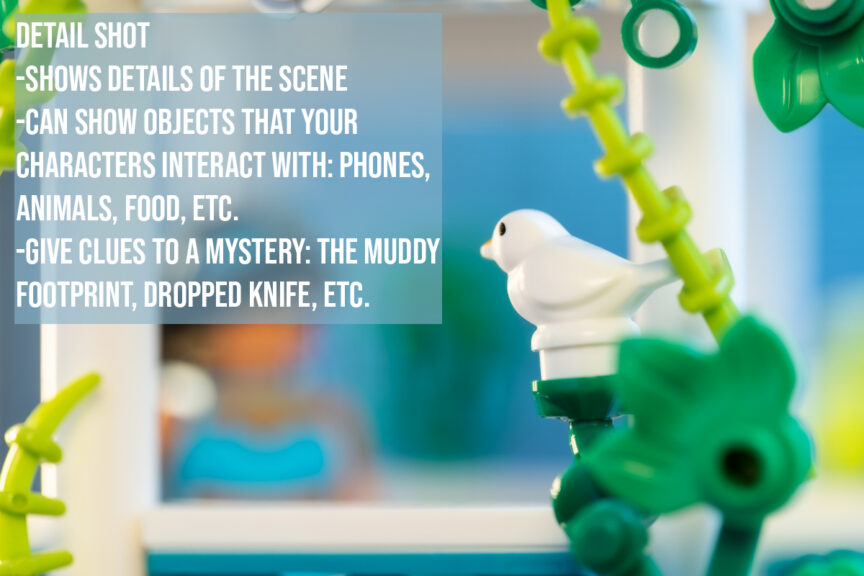
The Detail Shot is a variation of the extreme close up where we are focusing on an object or accessory. This shot would be great for our #bc_builddetails and #bc_minifigless tags. It is used to highlight a storytelling element in the scene that the viewer may not notice.
POV Shot
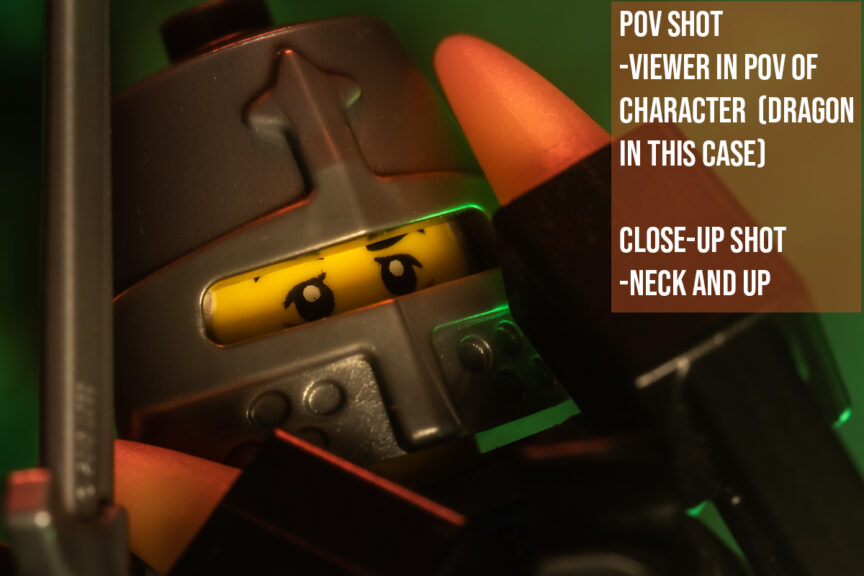
The purpose of a POV Shot is to make the viewer feel like they’re part of the scene. One way to achieve this is to have a limb extending from the edge of the frame, as if the viewer’s hand is interacting with the subject. In this example, I chose a dragon’s POV, with his claws grasping the knight.
Over-the-Shoulder Shot
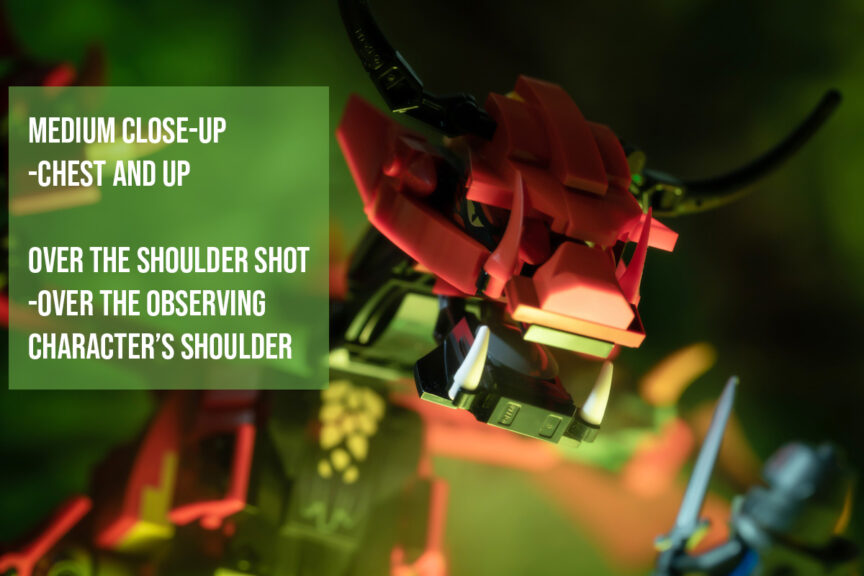
The Over-the-Shoulder Shot is another way to make the viewer feel like they’re part of the scene. Shot from behind the shoulder of the observing character, it makes the viewer feel like they’re standing just behind the observing character, looking at the subject.
There are many shots that I haven’t been able to include due to how long this article is getting, but I hope this helps inspire you to create some great LEGO photography.
Thanks for reading!
~@glowingbrickette
Great post! Framing camera shots is crucial for creating visually appealing and engaging content. I like how you broke down the different types of shots and provided examples. It’s helpful to have a clear understanding of how to compose each shot for maximum impact. Can’t wait to try these techniques out in my own video productions!
more details here https://lucky101gamedownload.com
Wow, I didn’t know that framing camera shots could be so crucial in filmmaking! The examples in the article really helped me visualize the importance of perspective and composition. I’ll definitely keep these tips in mind when working on my own projects
Fantastic post! Mastering the art of framing camera shots is essential for crafting captivating and visually stunning content. Your breakdown of the various shot types, complete with examples, is incredibly insightful. It’s great to have such a detailed guide on composing each shot to enhance its impact. I’m excited to incorporate these techniques into my own video projects!
I am interested in photography, but I don’t know the points you explain in this post. Lol!
Great post! Your shot type breakdown is super helpful. Can’t wait to try these techniques!
This is a great breakdown of camera shot types and their uses in framing! Understanding the different angles and how they impact the story is crucial for any filmmaker or photographer. The examples provided make it easier to visualize how each shot conveys different emotions and contexts. Really informative and useful for anyone looking to improve their visual storytelling skills!
Excellent article! It’s inspiring to see Crocs making sustainability a priority and tackling the issue of plastic waste. Transitioning to eco-friendly materials is a significant step forward for both the brand and the planet. Hopefully, more companies will adopt similar initiatives to create sustainable products. Excited to see how Crocs progresses in this journey!
CapCut templates provide a quick and efficient way to produce engaging videos. These templates come with preset themes, transitions, and effects that users can customize by adding their own media. Perfect for social media, content creation, or personal projects, CapCut allows for intuitive editing without requiring advanced skills. Users can adjust the template to suit their unique style while maintaining the polished look that professional editing tools offer. The ease of use and versatility make it an ideal choice for creators looking to save time while still producing high-quality videos.
create eye catching videos
The Yes or No Wheel is a fun and engaging decision-making tool. Users spin the wheel to get a random “yes” or “no” answer, making it ideal for games, quick decisions, or resolving minor uncertainties. The wheel’s randomness ensures impartiality, adding excitement and unpredictability. It can be customized for different contexts, from lighthearted fun to more serious choices. Whether you’re looking to add some thrill or simplify decision-making, the Yes or No Wheel is a versatile tool that can spice up any situation.
https://thechoicewheel.com/yes-or-no-wheel/
Best article. Thanks!
Looking to add some humor to your wardrobe? Our funny t-shirts are perfect for that! As a t-shirt graphic designer, I love turning clever jokes, puns, and playful designs into wearable art. Each shirt is made to add a bit of fun to your day, whether you’re at a party or just relaxing at home. Perfect for anyone who wants to express their sense of humor and stand out with style! https://clik.social/read-blog/16905_the-best-funny-t-shirts-hilarious-designs-that-are-sure-to-make-you-laugh.html
This is a great breakdown of camera shots! Understanding framing and purpose really helps in storytelling, whether in filmmaking, photography, or even toy photography. I especially love using POV shots for a more immersive feel. If you’re into capturing exciting moments, click here to download lucky 101 apk and try your luck with some thrilling games while exploring creative photography!
thanks for sharing te great info
I really loved this post on framing camera shots! The examples you included helped clarify the concepts, and I can’t wait to experiment with these techniques in my own photography. Thanks for sharing such valuable insights!
Thanks alot I wa slooing eifkd
Thank you I loved this post very much very informative
Great insights on camera shot framing! I never realized how much impact the angles and composition can have on storytelling in photography. The examples you shared really helped clarify the concepts. Thanks for the tips!
Great insights on framing shots! I love how you broke down the different techniques and their impact on storytelling. Can’t wait to apply these tips to my own photography!
Great insights on camera shot framing! I never realized how much the composition of a shot could affect storytelling. The examples you provided really clarified the concepts for me. Can’t wait to apply these techniques in my next project!