This article is intended as a compilation of tips to consider when shooting entire LEGO-built scenes, especially if you don’t have a lot of brick resources available for large MOCs. My goal is to remind you of some important compositional basics to consider when you build your brick scene and how to utilize this to use as few bricks as possible.
When you are responsible for building your scene, you will also be responsible for the entire composition of your shot. It is therefore essential that you build with the composition and lighting concepts you will be using in mind, so it is important to review these concepts when building your own LEGO set.
The beginning of everything is remembering that good photography does not depend on grandiose or super-detailed MOCs. You can do this even if you have few bricks and even if you are not a great LEGO builder. So my first tip is:
Build only what you need
Design the scene in advance considering the message you want to convey, the characters and accessories you want to use (drawing is great for this) and the amount of bricks you have available. Thus, you will build your scenery specifically for your photographic intention and do it according to your possibilities.
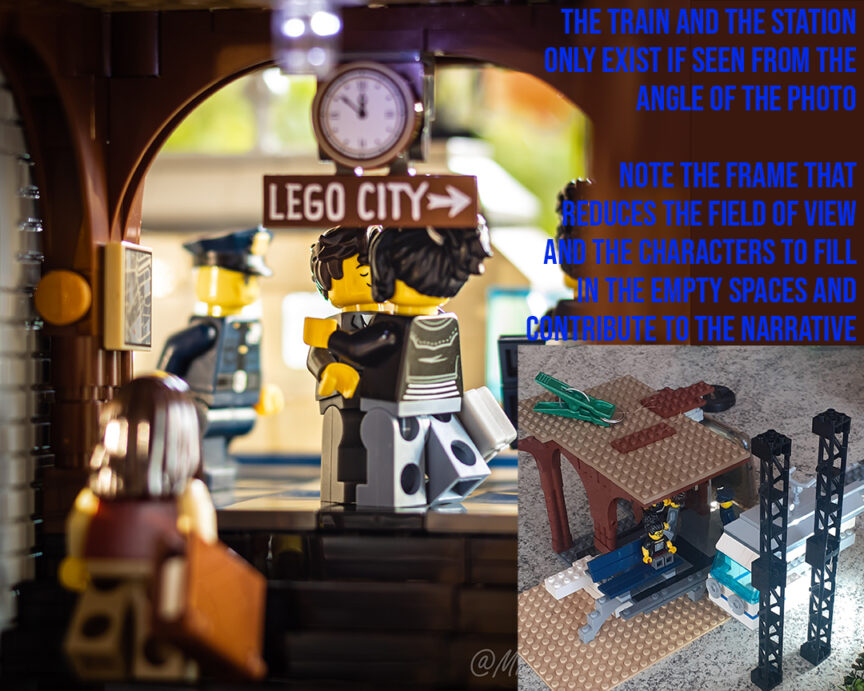
Consider background, foreground, and middle ground elements in your planning. They are essential for good composition and can be used to save the use of many bricks. Elements added, depending on the chosen camera angle (another essential factor for the composition) will hide what’s behind, therefore, in this area you can save your bricks if you don’t have a lot of them available. Such elements can be very useful to enhance your composition as frames, guidelines or repeating elements.
Also remember to choose matching colors for your scene.

Prioritize details over size
Shooting a wide scene can be an option (wideness can mean a lot in a photograph), however, if you don’t have that specific goal, prioritize details more than size. It is very common for photographers, when building their sets, especially when building large walls using Brick Modified with Masonry Profile, to leave a lot of negative space in the scene, which impairs the composition.
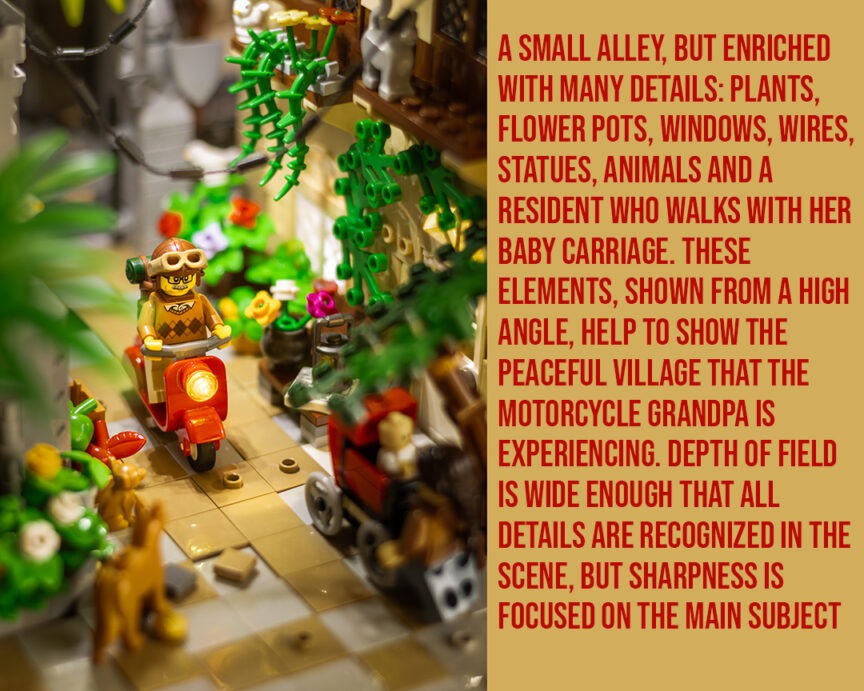
Take advantage of the infinite building possibilities that LEGO provides and include elements in your scene to fill in empty spaces and contribute to the message told by the photo: windows, small animals, accessories, frames, decorations.
However, be careful not to overly pollute the scene and include unnecessary distractions against your main subject. Always think if that information is related to the proposal of the photograph. If there is no connection then it will be an unnecessary distraction. Also be careful with the depth of field so that your MOC is not blurred by the lens aperture.
A big blur (large lens opening) can be interesting in some photographs, but it doesn’t make sense to build a scenario out of bricks to blur it all. On the other hand, too many elements within the field of focus can make the subject of the photograph scattered among many distractions in the image. Always look for a suitable depth of field for the message you intend to transmit.

These considerations should be noted for whatever type of scenario you are working with. Now I want to bring some specific tips for when you build scenes indoors or outdoors
Photographing interiors
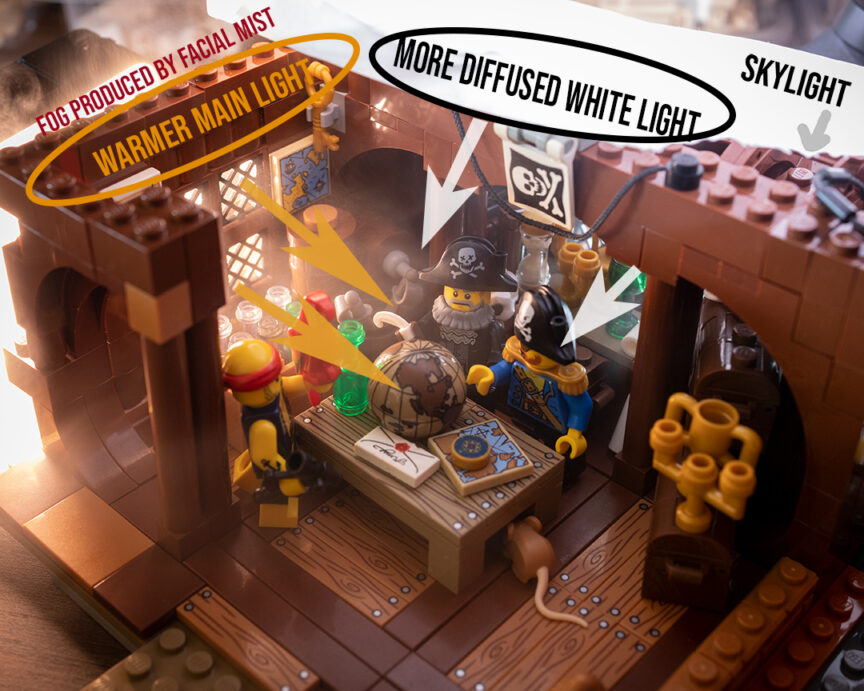
When building interior environments for your photographs, remember that interior partitions, doors and windows are always passageways for light. Therefore, be creative when designing rooms and take advantage of this to favor your lighting.
Lighting is one of the main differentials for indoor photography. Light leaking through doors, windows and hallways are excellent for creating a good atmosphere. There is a tip from June 2022 written by @Y.Badiner that is very good on using flags to control lighting. The use of microleds is quite interesting to bring realism to lamps and table lamps. Opening a few holes in the ceiling can be a good tip for inserting a light source into the scene, as most indoor environments are illuminated by the ceiling.
I am very inspired by the lighting techniques used in cinema and I try to reproduce them with the materials I have available. The goal is to find a realistic and interesting lighting scheme for the scene that highlights the main subject.

Normal or slightly elevated camera angles are interesting when you want a more intimate scene and highlight different elements in the scene, such as showing the mess of a room. However, very high angles may not be very good because they do not correspond to natural vision. This is the main difficulty in photographing some LEGO sets like the modular ones that are beautiful constructions, but too tight for a camera. The best way to solve this is to break walls and thus allow the lens to zoom in (macro lenses may be needed for this). You can find this and other tips on photographing building interiors in the words of @Fourbrickstall on her blog.

Photographing exteriors
Photographing outdoor scenes built with LEGO tends to demand greater availability of parts. Typically these are city streets (modular sets are great), back alleys or natural surroundings.
Since I don’t have a lot of bricks available, it’s important for me to plan the scene to save as much brick demand as possible. I usually build only the facades of buildings and limit the construction to only what will appear in the photo.
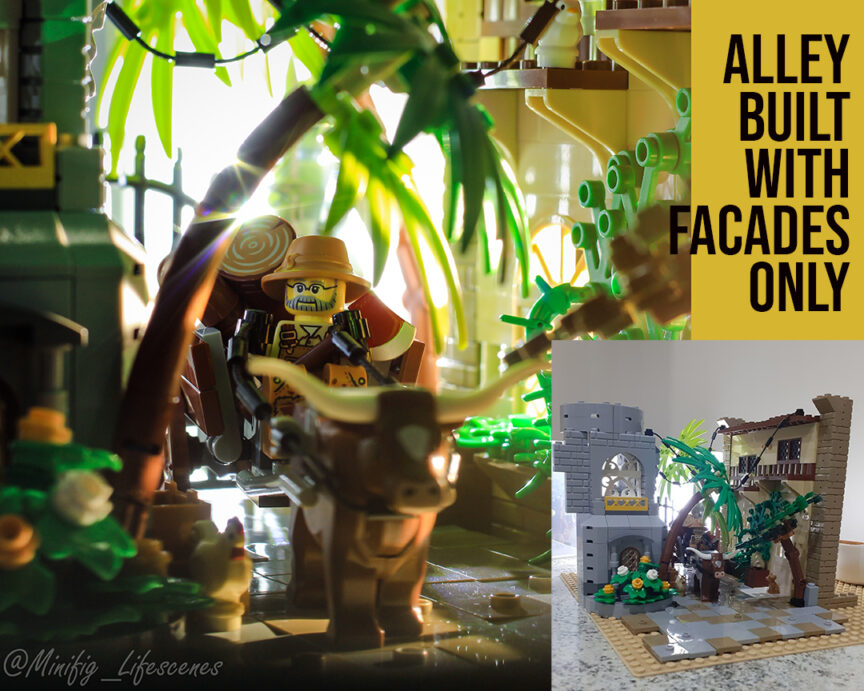
Also, I use other features to utilize fewer parts. In order not to lack tiles/plates for the floor, I include elements that reduce the view of the ground, such as low walls. They also hide the horizon line, which makes adjusting the background easier. Building a gap in the ground can also be good for saving bricks, as the scene angle only shows the ascending part and hides the descending part.
Another feature is to limit the field of view to avoid too wide scenery.

The background gives me a lot of difficulty, so I try to fill the space as much as possible. I like to use large sets as backgrounds, modular sets and the blacksmith’s house are my favourites.

For lighting, I try to simulate natural light as per the desired intent (harder or softer light, warmer or cooler light). I usually simulate the golden hour with softer lighting, but it can be tedious if you use the same lighting all the time.
Projecting lights through the windows of houses is always a great feature. It’s easy to position lights behind the facades of houses and buildings. I really like to shoot close to my window to take advantage of diffused natural light, so I position my setup according to the incidence of natural light to shoot.
Conclusion
These were the selected tips and they are far from exhausting the subject. They are just a starting point to encourage you to this photographic style, especially to encourage those who believe they don’t have enough pieces for it. With creativity, you can use photographic composition to your advantage, to better allocate your building resources and thus be able to photograph more detailed and larger scenes.
I hope they may have been helpful in some way. Good builds and good photos guys!