About The Set
At first glance this sleek, fire-red speedster looks a little out of place in a Ninjago universe full of temples, dungeons, dragons, and giant mechs. However, once you start building you realize very quickly that this is no ordinary sport car. With lots of blades, a projectile launcher, and a really well-built hidden bike mechanism, there is a lot to like about this set that is both play friendly and display worthy.
Concept
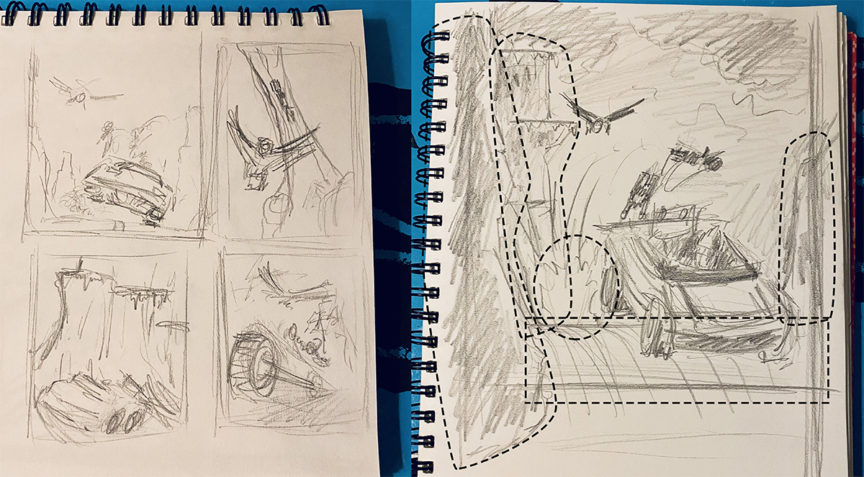
My motivation was simple: I wanted a really cool chase scene! But if you know my style I like to build everything out of LEGO so I had to be pragmatic with the layout as well. I started with a series of quick thumbnail sketches and fairly quickly gravitated towards one concept that was both dynamic and economical build-wise.
Building The Props
I usually recommend building sets by checking the layout through the camera with the focal length you plan to shoot at. This helps you see how the props you’re building actually look from the view of the camera and prevents you from building unnecessary parts that are not visible.
In this case, however, each piece was so distinct and could be manipulated individually that I built them out separately and assembled them in front of the camera later, making adjustments on the fly.
Rock Structures
In the sketch I identified 3 main rock formations. Two medium sized rock structures in the front to frame the scene (although I cut the smallest piece on the right in the final pic), and a large rock structure in the back to give the illusion of there being a lot more rock there than there actually is.
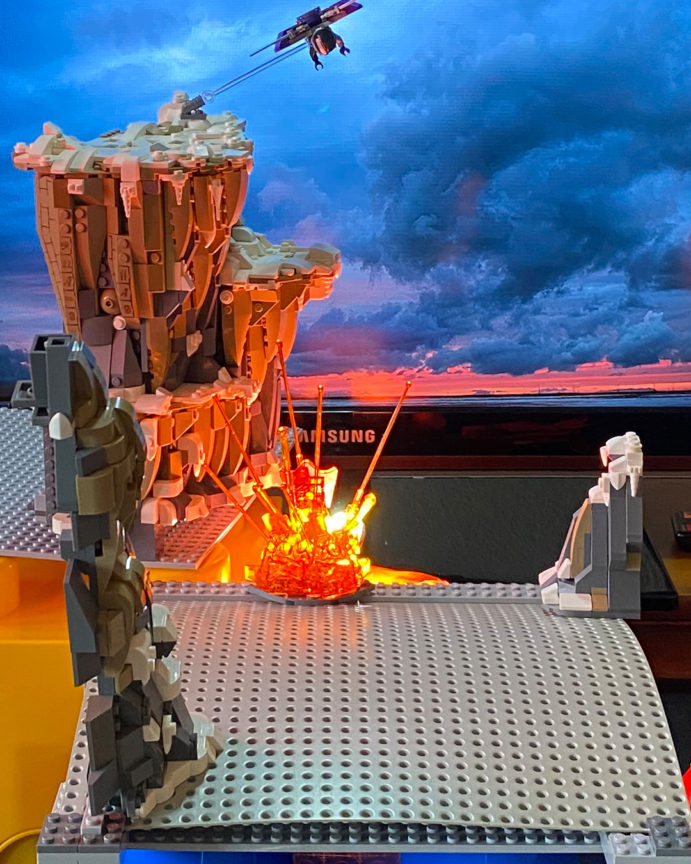
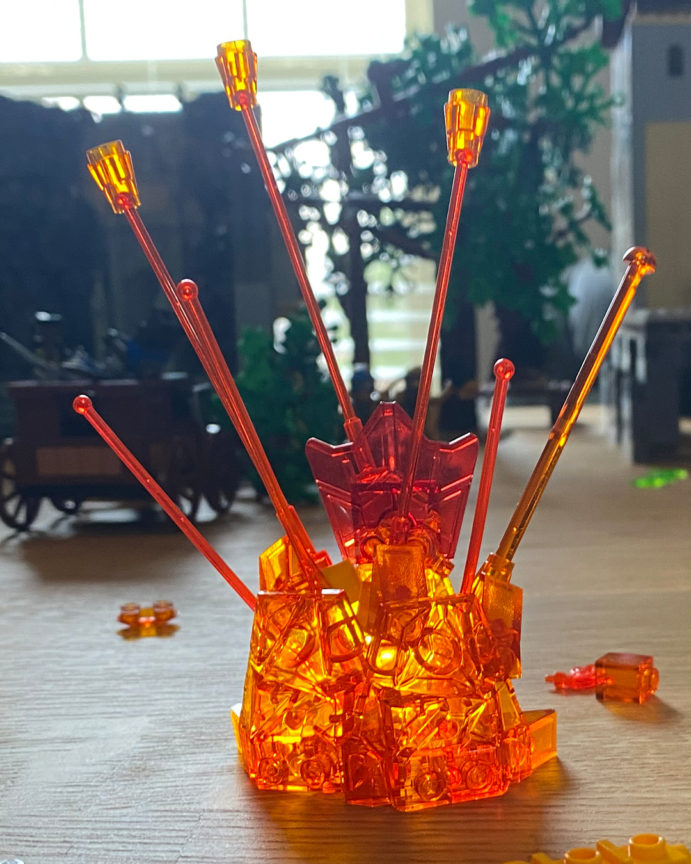
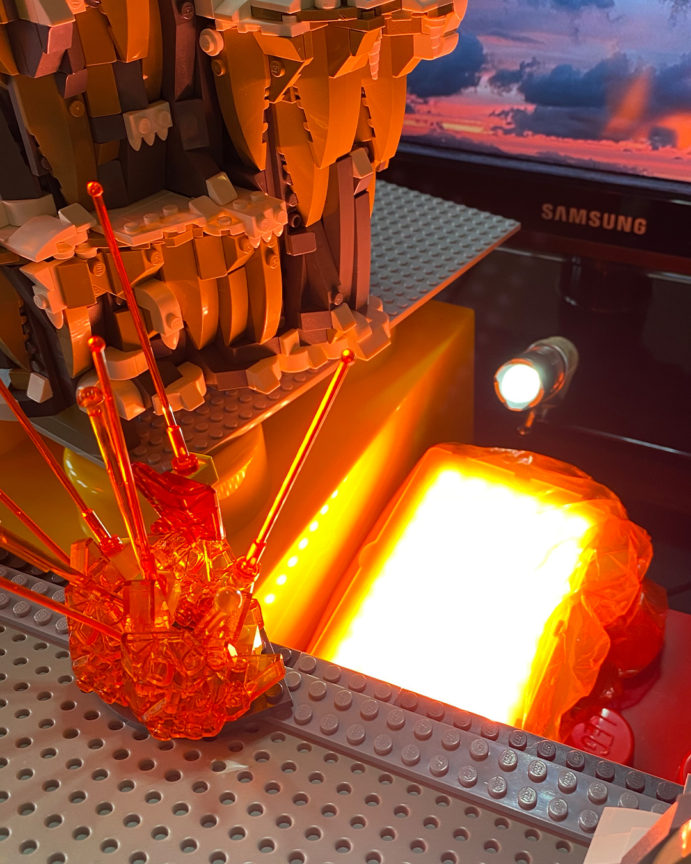
Explosion
For the explosion, the easiest way to show it in a dynamic way is to have the fire streaks coming out of a central fireball. The construction is simple but I was just looking for something that could be lit from the back.
Road
The road was actually a very critical piece to making this concept work. The only way to include the road the way I drew it in the thumbnail was to have a curved surface. To do this I took an old grey 32×32 base and curved it over a center support and clamped the two ends down with plates.
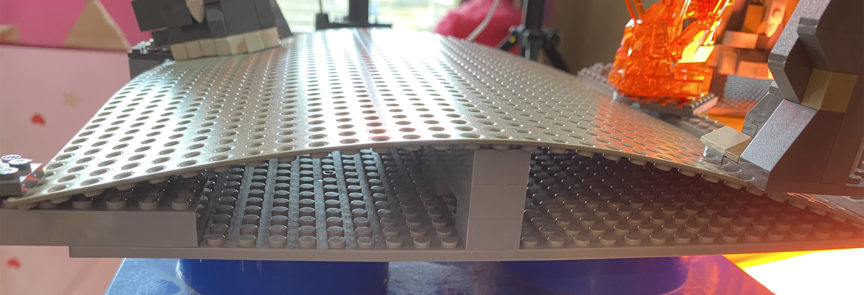
While the effect is subtle in the final image, you can still see the curve affect how the light interacts with the road and the slow perspective shift as you get close to the apex.
The whole scene works because of this curved road and allows for all the gaps in the rock surfaces to be believable without the need to see where the rock connects to the road all the way to the back structure.
Setup
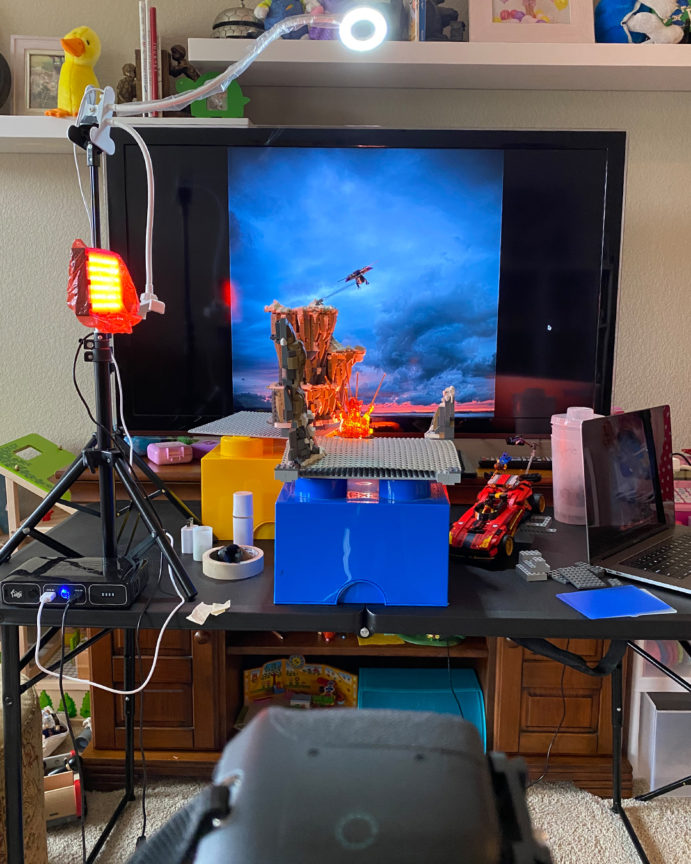
Backdrop
I wanted a dark cool grey sky to contrast with the reds in the scene. I looked through royalty free images and then manipulated the colors and position of key features in photoshop and then displayed it on a TV screen behind the setup
Lighting
It’s a good idea to have a primary light source in a scene that you can build around, I find this makes it easier for me to create the drama I want. Too many light sources start to confuse the visuals.
In addition I’ve found that a practical light source (a light source that is visible within the scene) is great for realism because you can connect the light you’re seeing with something tangible. In this case the explosion is both the primary light source and a practical light source.
To get the explosion lit up I used two lights; one panel light with orange gels and diffusion to get the ambient color for the set and one small flashlight (torch) to hit the trans orange LEGO pieces and light up the actual explosion. A small orange bulb placed behind the explosion would have also worked (possibly even better) but I did not have anything suitable.
The secondary light source in this scene is defined by the sky. It appears that whatever sun light is coming through is coming from the top left. To match this type of diffused light I used a combination of ambient daylight coming in from windows on the left side and a small ring light top left to hair light the minifigs and rock structures.
Taking The Photo
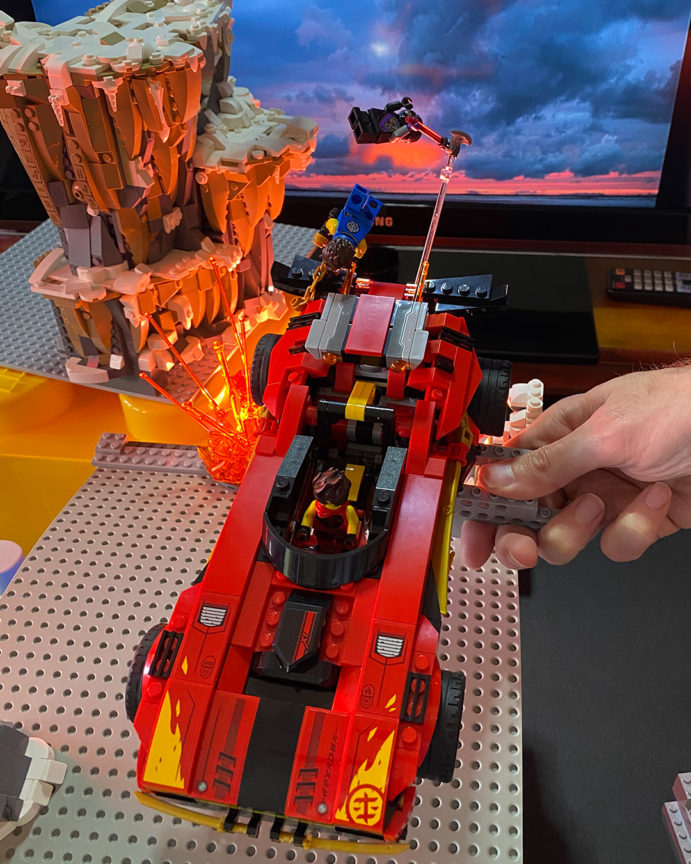
The most challenging part of taking the picture was the car itself. I was unable to find a stable way of positioning the car on the road at the angle I wanted, so I had to hold the car and take a series of pics with the car and without.
This allowed me to get a more interesting angle but it was challenging to get the focus set properly and to recreate an angle if I did like it.
I used a 50mm prime lens which is a departure from my normal wide angle view out of necessity to get all the components from the foreground to the TV screen in frame. A wide angle lens positioned closer to the car would have shown all the gaps in the set and not allowed the TV screen to cover the full background.
Camera: Canon Rebel EOS T5, 50mm, f/ 5.6, Shutter: 1/15, ISO: 400
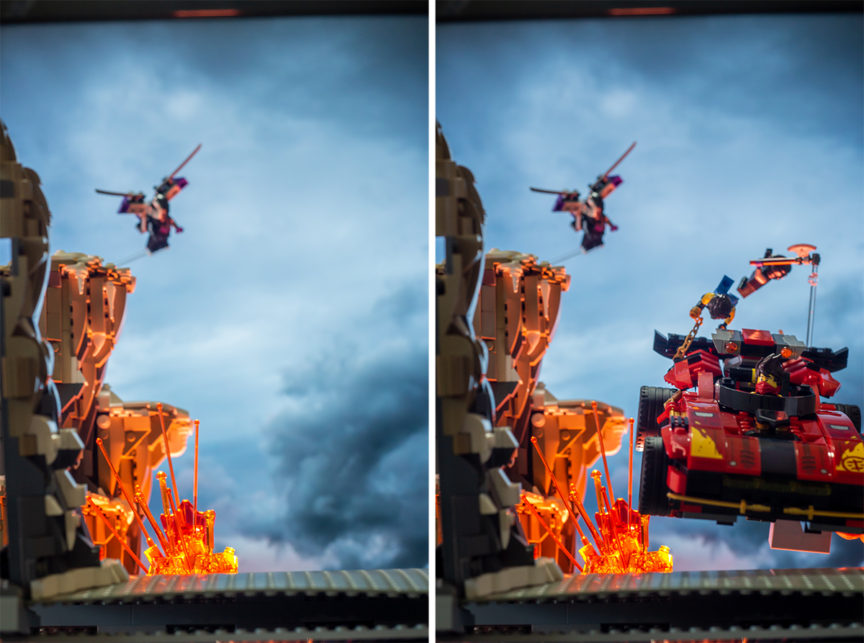
I combined the two images in Photoshop by layering the second image over the first and masking out my hand and additional bricks under the car.
Post Editing
Atmosphere is important in all my photos to help create the illusion of depth and scale. In this case my misters were not doing the trick and I had no way of containing the atmosphere spray in a meaningful way to disperse evenly in the scene.
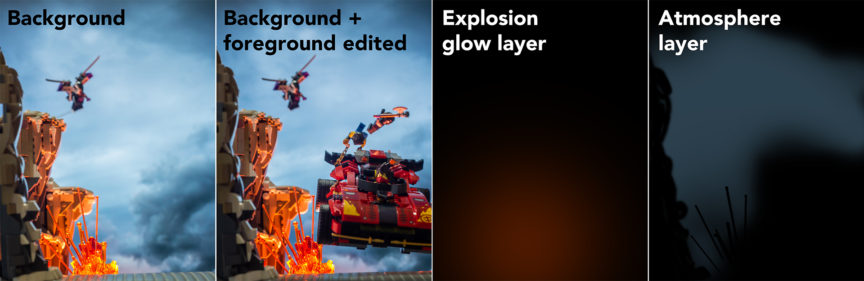
So this time I opted to use Photoshop to paint in the atmosphere by using a “lighter color” layer and selecting a mid-tone blue from the sky. Once the blue was brushed in I erased along the edges of the close objects in the scene to create a sharp edge completing the illusion. In addition I did some dodge and burn touch ups throughout to make the car pop more.
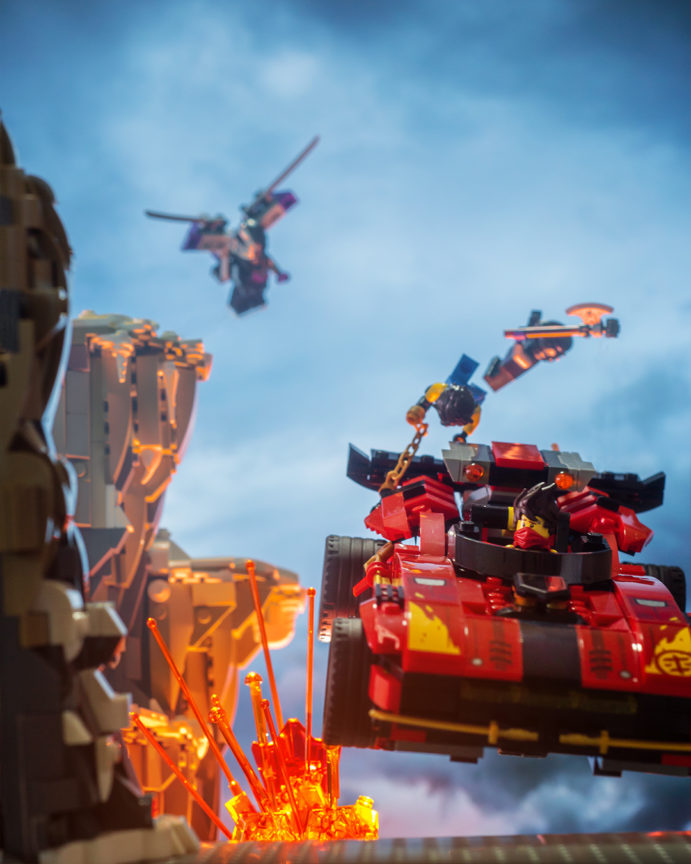
Final Image after some additional balance tweaks:
LEGO & Brickcentral provided this set to @circus_robot to shoot and share his behind the scenes information. The views expressed in this post are all his own.