The Bonsai Tree 10281 is a perfect display set for LEGO fans who don’t have a dedicated LEGO room and want to integrate a beautiful brick model into other areas of their home.
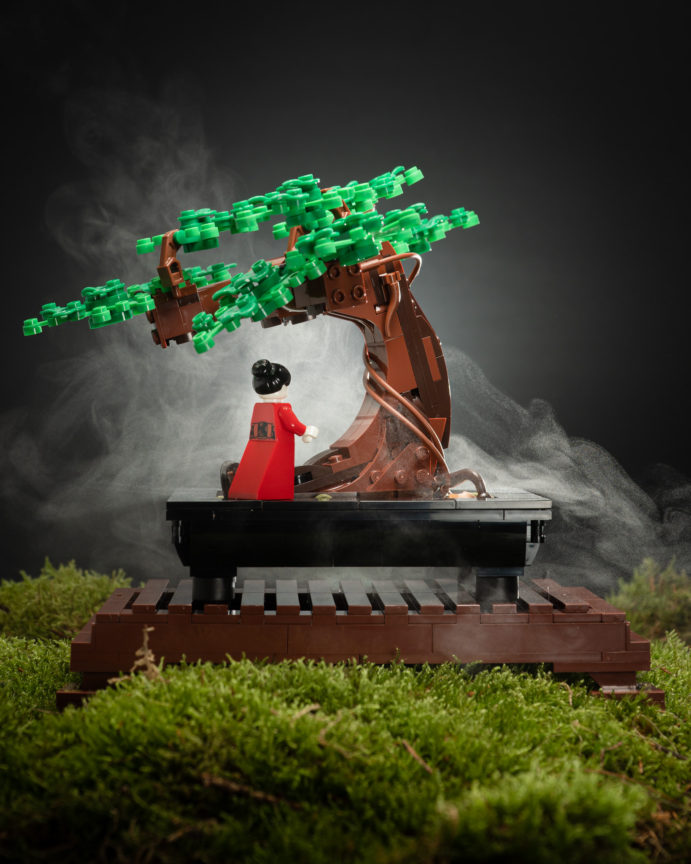
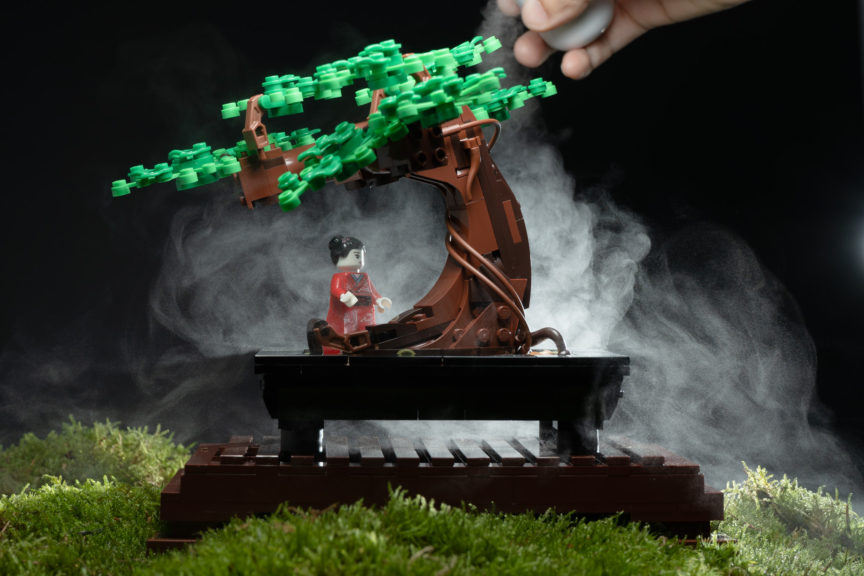
The completed Bonsai Tree measures over 7 in. (18 cm) high, 8.5 in. (21 cm) long and 7.5 in. (20 cm) wide, which is a lot smaller than my real Bonsai trees, so it doesn’t really take up much space at all in my small studio. The geisha minifig should give you a sense of scale.
I have to say that the LEGO version is a lot prettier and more substantial than my Bonsai saplings at the moment, and requires far less care, so I am loving it.
The organic design of the Bonsai Tree is, of course, what makes this set stand out among other LEGO sets. The trunk is made up of various curved and sloped parts in the two browns, and slightly tilted upward, which lends to that organic look.

In the base of the tray is a 4×4 turntable base which allows for the finished tree to be angled. It’s another small but important design decision that helps create the illusion of a natural form.
There are two sets of leaves that you can easily swap whenever you feel like it: a green one and a cherry blossom one. I built the green version first and skipped the instructions for the cherry blossoms because I liked the flow and pace of the building experience, if that makes sense.
It took me a little over an hour to complete the verdant version and I sat admiring it for quite a while.
I came back to put together the cherry blossoms the next day.
The cherry blossom set of leaves has over 100 pink frogs, which is, well… a lot. Good thing I built those a day later or I think it would have spoiled my zen-like state. Up until the pink frog invasion, the Bonsai Tree was the most relaxing set I’ve ever built. You might say it was “ribbiting” (I’m sorry. I had to.)

On that particular instruction page, there’s a little note that says there are 101 frogs and that’s accurate: there is a single reddish brown frog in the tree. If you look close at the photo above, you should spot it.
For $49.99, I think this a great set to buy for yourself or as a gift, even to a non-AFOL. The build experience is relaxing and the model can be displayed anywhere, not just in a dark basement.
The Bonsai Tree 10281 is part of LEGO’s Botanical Collection which also includes the Flower Bouquet 10280. It’s available now on LEGO.com.
Behind the Scenes
Now onto the stuff for the LEGO photographers reading this review — the BTS.
I had a simple concept for the Bonsai Tree photo: get some mist winding around the tree trunk.
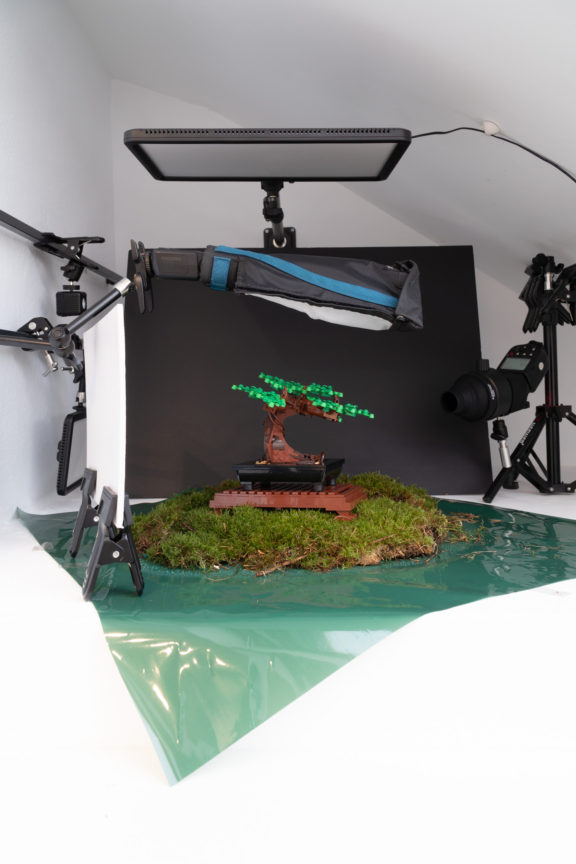
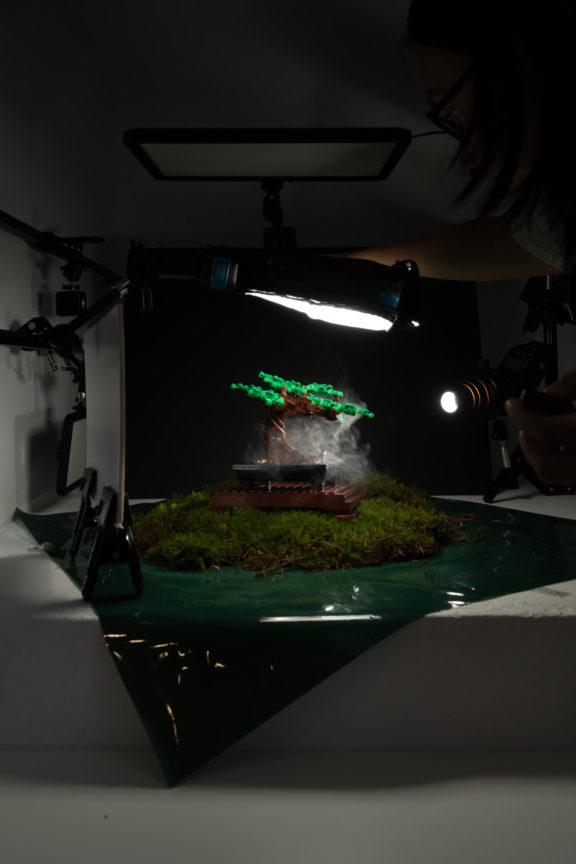
When working with mist or other practical atmospheric effects, you generally need two things so that the effect actually shows up: backlighting and a dark background. So the first thing I did was lean a large black foam core board against a small tabletop support in the back of my studio nook.
I moved my flash with a snoot beside it and aimed it towards where I would later put the Bonsai Tree set.
Having set those two things up first made it easier for me to place everything else in my rather tight shooting space.
Earlier that week, I had bought a layer of moss from a florist on a whim and I ended up using it as part of the scenery. It’s good to act on whims sometimes!
The florist had carefully wrapped it in a large dark green plastic sheet for transport so all I had to do was unroll it onto the surface of my studio nook.
(To take care of live moss, you should make sure it’s kept a little bit moist. I sprayed mine a few times a day with water to keep it nice and fresh. It’s now outside on my patio.)
I put the Bonsai tree on the moss and then rounded out my lighting setup. I positioned a smaller white foam core board on the opposite side of the snooted flash to bounce some light back into the front of the tree. That filled in some shadows with a softer light.
If you’re new to the idea of bouncing light, here’s a primer for you:
You can see that I have the small white foam core board held up by just a couple of clips. Clips come in super handy for so many things in photography so I suggest you always have a few in your kit.
Lastly, I put another flash in a small diffuser directly overhead to light the leaves and other parts of the tree trunk that weren’t lit by either the backlighting or the bounced light.
On my camera, I used a zoom lens so I could get the whole scene in the frame more easily. I set my aperture to something more narrow like f/11 to get more of the Bonsai Tree in focus.
Because I was shooting the set for LEGO’s social media channels, I didn’t want a shallow DoF because it blurs out edges and details too much. I want to make sure the set is seen clearly but artistically.
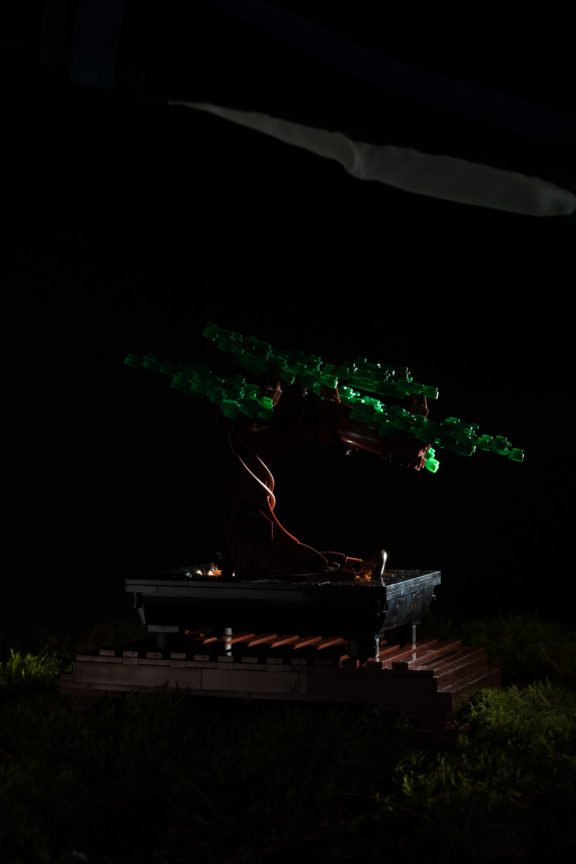
With my lighting and framing all set up, I took some test shots to work out the flash intensity, starting always with my backlight. I think backlighting is the more difficult part to get right so I do that first. Plus it’s physically the one that’s harder to reach so I’d rather get settled rather than disturb the rest of my setup to get to it later.
What I want to achieve with backlighting is to separate the model from the background and give it form:
All my other lighting depends on what my backlight is doing so here, I am just looking to light the treetop and lift shadows on the rest of the tree:
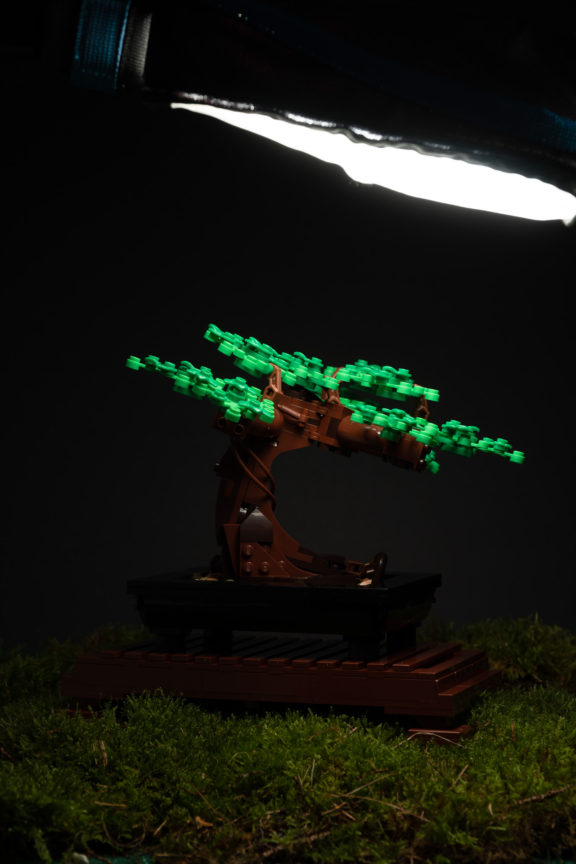
One thing to note: I reduced my overhead light intensity by at least a stop when I switched to the cherry blossom version. They are much brighter and reflected a lot more light than the green leaves.
Having my lighting all set up, I then use my $10 facial mister around the tree trunk and shoot until I get a mist shape I like:
Mist isn’t just some cool effect for me. I use it as a lighting tool. Notice how there’s more light wherever there is mist. The vapor is reflecting the light.
That’s it for the shoot!
Post-processing is just a matter of lifting some shadows and darkening parts of the moss in the foreground so it doesn’t distract from the model.
If you want to learn more about how I shoot LEGO sets and minifigs, check out my YouTube channel. Here’s one about adding atmosphere that you’ll find useful if you like this Bonsai Tree shot:
This Bonsai Tree is a great model to shoot with whatever leaves you decide to use: the ones provided or your own! I even added minifigs to mine because I thought it would be fun.