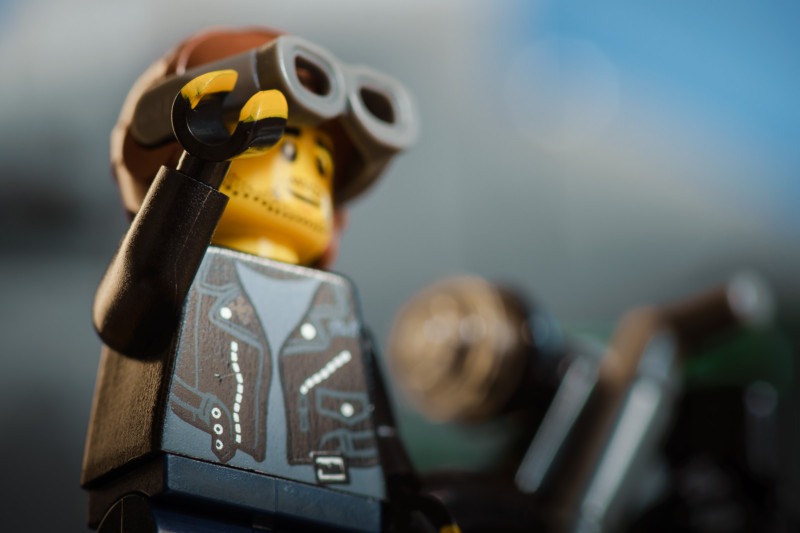
Brick Sailboat’s style is more than just low angle composition techniques, but it is a dominant feature, so that’s where I am going to start for my first entry.
Setup and Environment
I had planned an outdoor shoot on the top of the brownstone building so I could get some blue sky in my scene but unfortunately, the clouds were moving very quickly, changing the quality of light every other second.
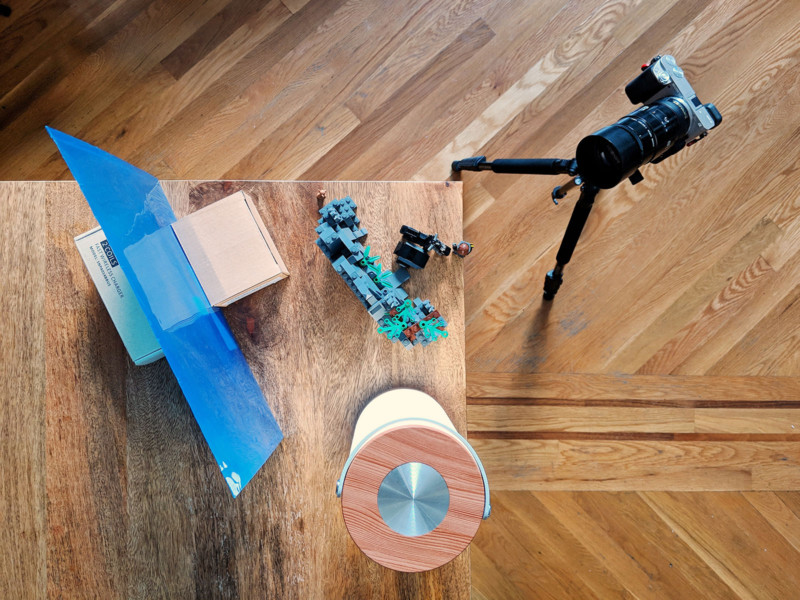
I resorted to shooting indoors on my dining room table instead:

My camera was set low on a tripod with the lens aiming up at the corner of the table where I precariously set the motorcyclist minifig.
To hide the exposed brick wall of my dining area, I grabbed a LEGO-built rocky mountain background and put that behind the minifig. I still needed some sky so I sandwiched my kid’s blue homework folder between two small cardboard boxes for support and placed those behind the mountain.
To the left of the set was a dimmable light that I use outside on the patio for BBQs. Nothing fancy but it does give off warm, soft light. I nearly always have this set on its dimmest intensity when I use it for minifig photography.
The minifig is right on the ledge of the table so I can compose the scene with very little, if any, of the table in my frame:
Camera and Lens
I like to shoot with a 100mm macro lens on a Sony APS-C body like an a6000 or a6500. It lets me get close, sharp shots without having to physically push my lens right up into a scene.
I also like the shallow depth of field (DoF) and the narrow field of view this macro lens provides.
One thing about shooting with a macro lens is that the DoF can be too shallow, even at its smallest aperture. You’ll often see photos of mine where just one part of the minifig is in focus but the rest of it isn’t. Sometimes that’s ok because it gives the photo a dreamy look:
Post-processing
Knowing that I wanted more of the motorcyclist in focus than his eyes but still be able to shoot wide open to gather more light and to get a nicely blurred background, I planned on using a technique called focus stacking.
Focus stacking is taking a series of photos with different focal points and then blending them all together in Photoshop or some other advanced photo editing software to get a photo that has more of the subject in focus. This technique is used a lot in macro photography.
If you’ve never heard of focus stacking before, Phlearn has a quick tutorial:
The first photo was focused on the part of the minifig closest to my lens, which was his hand:

The next shot was focused on his goggles, the next his eye, then his other eye and then the far side of his helmet. Five shots total, front to back, to cover the range that I wanted in focus for the final shot.
These changes to focus are done manually by turning the focusing ring ever so slightly, so I had to be careful to not move the camera so much (do not attempt this without a tripod). This is the bulk of the work. The rest is just a matter of running the images through automated processes in Photoshop.
Once in Photoshop, I auto-aligned the five images first because different focal points change the field of view slightly (aka “focus breathing”). That sounds like a complicated procedure but it’s really just a few seconds for a beast like Photoshop.
Next, I auto-blended the photos which takes Photoshop just slightly longer to do. Once done, you’ll have a clean composite of a sharply focused minifigure.
Finally, I made a few more edits in Lightroom but that’s just to my taste so I won’t go into detail here.
I am pretty happy with how the photo turned out but I still want to get outdoors to get some real sky in my next shot!


Nice – I haven’t tried focus stacking yet, I might give it a try!
Great shot buddy. Love the minifigure. Which collection did you get this one from?
Thanks.